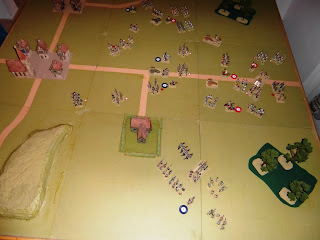
Tactical Map at start of battle
Far Left – French reserve have orders
to support 9th corps
Left – 9th French corps
have orders to attack Wels
Right – 3rd Austrian corps
have orders to redeploy
Far Right – Austrian reserve have
orders to support 3rd corps
Table at start of battle
Top left unnamed village
Centre left is the town of Vockabruck
The road north leads to Raab
The road west leads to Frankenburg
The road east leads to Wels
The road south leads to Withering
French Austrian
8960 infantry 9040 infantry
1160 cavalry 1160 cavalry
1200 gunner’s 1200 gunners
2nd French division - one
brigade has 10% casualties
4th French division - one
brigade has 10% casualties
12th Baden division - every
brigade has between 10% and 20% casualties
5th Austrian division – one
brigade has 10% casualties
6th Austrian division – one
infantry brigade has 20% and the cavalry 10% casualties
7th Austrian division –
full strength
Special Rules
4th French division will
arrive at the start of move 5
7th Austrian division will
arrive at the start of move 5
5th Austrian division will
arrive at the start of move 9
Move 1 – 0800 to 0900
Left – French
Both divisions are delayed by having
to advance through built up area
Right – Austrian
6th division ordered to
Hold and deploy
Move 2 – 0900 to 1000
Left – French
Both divisions ordered to deploy
Right – Austrian
Deployment complete but enemy out of
artillery range
General Lederer leaves to meet 7th
division
Move 3 – 1000 to 1100
Left – French
Both divisions start to deploy
2nd division artillery
unlimber
Right – Austrian
Enemy still out of artillery range
Move 4 – 1100 to 1200
Left – French
Both divisions have cleared the built
up area
French have 12 pounder guns and are
within long range of Austrians
Open fire, but no casualties
Right – Austrian
French are still out of range of
lighter Austrian guns
Move 5 – 1200 to 1300
Left - French
4th division arrives and
moves to right of 12th division
2nd and 12th
divisions continue to deploy
Right – Austrian
7th division arrives and
moves to right of 6th division
Move 6 – 1300 to 1400
Left – French
12th division (top) are
ordered to Hold, too fragile to advance and engage enemy
2nd division (centre)
continue to fire on enemy and prepare to advance
4th division (bottom)
advance towards farm
Right – Austrian
7th division (top) advance
and prepare to engage 12th division
6th division remain on hold
but suffer artillery casualties
Move 7 – 1400 to 1500
Left – French
12th division (top) cavalry
lose melee
2nd division (centre)
advance to engage enemy
4th division (bottom)
cavalry approach Austrian left flank
Right - Austrian
7th division (top) cavalry
win melee, infantry form column of attack
6th division (bottom)
continue to receive casualties from French artillery
Move 8 – 1500 to 1600
Left – French
12th division (top) cavalry
rout and infantry square shaken
2nd division (centre)
advance and screen artillery
4th division (bottom)
continue to advance against Austrian left flank
Right – Austrian
7th division (top) advance
towards 12th division
6th division (bottom) break
due to enemy artillery fire
One brigade in rout, two more (plus
gunners) shaken
Cavalry withdraw behind infantry
square
Move 9 – 1600 to 1700
Left – French
12th division (top) pinned
by enemy cavalry whilst infantry advance
2nd division (centre)
cavalry and supporting infantry routed as they charge guns
4th division (bottom)
moving into position to attack Austrian flank
Right - Austrian
7th division (top) continue
to advance against Baden division
5th division (centre) start
to arrive on Wels road
6th division (bottom) start
to break as French press home their attack
Move 10 – 1700 to 1800
Left – French
12th division (top) left
flank break and rout
2nd division (centre) all
in rout except for artillery
6th division (bottom) start
to deploy to attack
Right – Austrian
7th division (top) approach
Baden division
5th division (centre) halt
and deploy to cover rout of 6th division
6th division (bottom) three
brigades and gunners in rout towards Wels
Move 11 – 1800 to 1900
Left – French
12th division (top) charged
in flank, breaks and routs
2nd division (centre) all
in rout except for artillery
6th division (bottom) halts
to await further orders
Marshal Oudinot orders retreat towards
Frankenburg
Right – Austrian
7th division (top) cavalry
charge and rout gunners, remaining infantry join rout
5th division (centre) halt
and deploy to cover rout of 6th division
6th division (bottom)
continue to rout towards Wels
Summary
Both sides have suffered heavy
casualties in this battle.
Both sides will take some time to
recover and rally routed brigades
The Austrians have suffered 1200
casualties and lost 6th divisions guns
There are 5 brigades in rout.
The French have lost 1480 casualties
including 12th division guns.
There are 11 brigades in rout.
Marshal Oudinot has ordered a general
retreat.
Archduke Charles is claiming a
victory.


No comments:
Post a Comment