
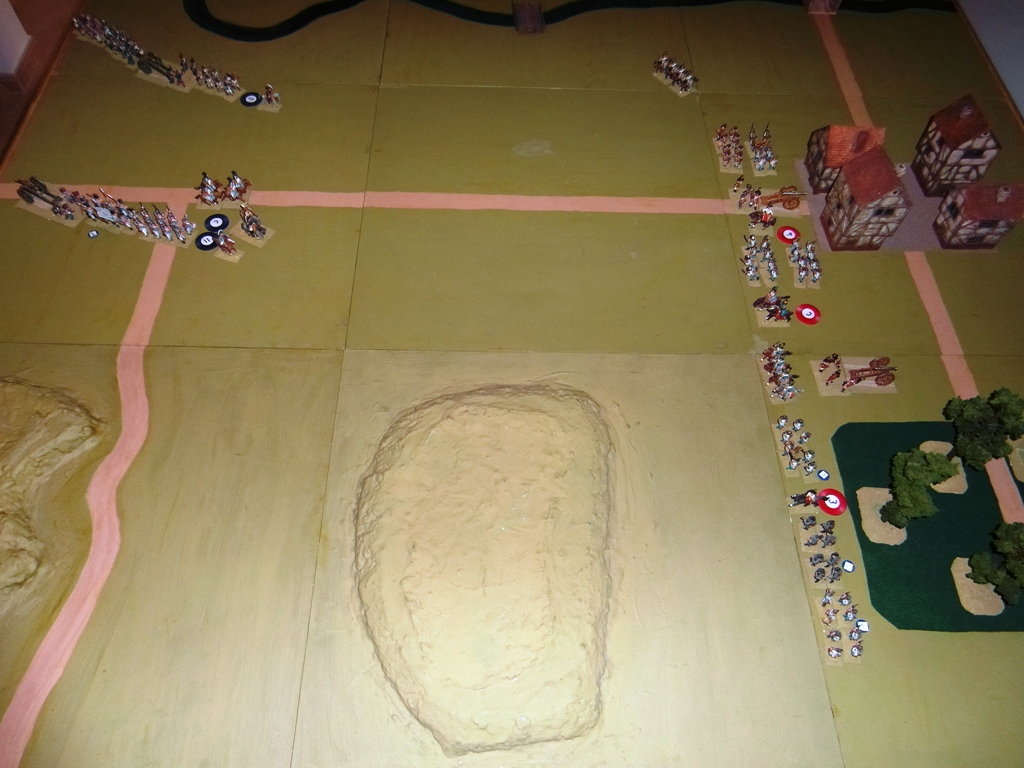
Tactical Map at start of battle
Left – 8th French corps
have orders to attack Withering
Right – 2nd Austrian corps
have orders to hold and regroup

Table at start of battle
River is the Danube
Centre right is the town of Withering
The road north leads to Rohrburg
The road south leads to Wels
The road west leads to Raab
The road east leads to Linz
The road south leads to Withering
French Austrian
6080 infantry 5760 infantry
720 cavalry 800 cavalry
800 gunners 800 gunners
5th French division has 80
casualties in the cavalry brigade
11th Bavarian division has
320 casualties between three infantry brigades
3rd Austrian division has
640 casualties between four infantry brigades
4th Austrian division is
full strength
Special Rules
8th French corps will
arrive from the left at the start of move 1
Move 1 – 0800 to 0900
Left – French
Both divisions enter the table from
the left
Right – Austrian
Both divisions are on hold and must
wait for orders from the corps commander

Move 2 – 0900 to 1000
Left – French
Both divisions deploy from march
column
Right – Austrian
3rd division (bottom) move
towards hill
Cavalry secure the hill to protect
artillery

Move 3 – 1000 to 1100
Left – French
5th division (top)
artillery unlimber and infantry form square to protect them
11th division (bottom)
cavalry charge Austrian hussars, melee is a draw
Remainder of division halt, form
square and unlimber artillery
Right – Austrian
4th division (top) still
out of artillery range
3rd division (bottom)
cavalry continue melee, still inconclusive
Artillery abandon hill and division
deploy to the right of the hill

Move 4 – 1100 to 1200
Left – French
5th division (top) has
moved into artillery range, but is more concerned about the Austrian cavalry,
as they have no cavalry on to counter them.
11th division (bottom)
cavalry have won the melee and the Austrian hussars have retreated shaken. The remainder of the division can now
advance
Right – Austrian
4th division (top) cavalry
have withdrawn out of artillery range, but still pose a threat to the enemy
infantry as they advance
3rd division (bottom)
cavalry have lost melee and withdrawn shaken.
Infantry square has moved forward to
protect them.

Move 5 – 1200 to 1300
Left – French
5th division (top) continue
to advance. Artillery have caused
casualties on one of the enemy infantry brigades, but their cavalry is still
out of range
11th division (bottom) have
advanced to the top of the hill to pursue the shaken enemy cavalry. In doing so they come within range of the
infantry square and they in turn withdraw.
Right – Austrian
Both divisions wait for the enemy to
advance

Move 6 – 1300 to 1400
Left – French
5th division (top) have
moved their infantry to their left flank, but slow the advance due to the
threat from the waiting cavalry. The
enemy cavalry remain out of artillery range and are difficult to counter
without any French cavalry on this flank
11th division (bottom)
again advance their cavalry on the hill, and force the enemy horse to
retire. Their infantry have changed
into column of attack and start to move towards the hill
Right – Austrian
4th division (top) change
their orders to Engage so that their cavalry can advance to pin the enemy
infantry
3rd division (bottom) move
infantry to support the square on the hill.
Their cavalry again fail to rally and remain shaken.

Move 7 – 1400 to 1500
Left – French
5th division (top) continue
to fire on the nearest infantry brigade and cause them to rout
11th division (bottom)
charge the shaken Austrian cavalry and rout them. The nearby square tests morale, also fails
and joins the rout.
Right – Austrian
4th division (top) have
lost one infantry brigade to artillery fire, and the rout spreads to a second
infantry brigade and the gunners who also rout. Commander cancels his orders to advance.
3rd division (bottom)
cavalry break and run when they are charged by the French hussars. The nearby infantry square already has 20%
casualties, fail their morale and join the rout.
With five of his brigades in rout
General Hohenlohe orders the remainder of 2nd Austrian corps to
withdraw before the French can close with them
Summary
A decisive French victory.
This defeat may well mean the loss of
the campaign for the Archduke Charles
Total casualties, including from
earlier battles, at the end of this battle
Austrian 840 casualties and five
brigades in rout
French 360 casualties and no routed
brigades
No comments:
Post a Comment