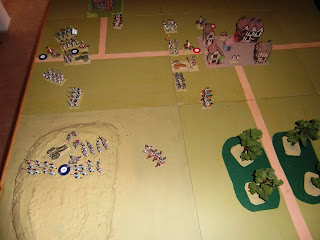
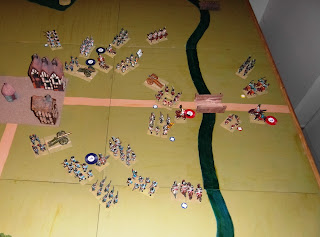
Tactical Map at start of battle
Left – 7th Bavarian corps
have orders to attack Obernzell
Right – 1st Austrian
division has orders to hold Obernzell
Far Right – 2nd Austrian
division has orders to rest and resupply
Table at start of battle
Top left is an unnamed farm
Centre is the town of Obernzell
Right is the river Danube
The road west leads to Passau
The road east leads to Rohrburg
The road south leads to Raab
7th Bararian Corps 1st Austrian
Division
6320 infantry 3200 infantry
800 cavalry 400 cavalry
800 gunners 400 gunners
Special Rules
10th Bavarian division will
enter centre left at the start of move one
9th Bavarian division will
enter bottom left at the start of move one
2nd Austrian division will
not take part in this battle
They are a full days march away and do
not have orders to march to the sound of the guns
Move 1 – 0800 to 0900
Left – French
10th division (top) enters
the table on Attack orders
Corps commander changes their orders
to Engage
9th division (bottom)
enters table on Attack orders
Right – Austrian
1st division is on Hold
orders, they can neither advance nor retreat
Enemy are out of artillery range
Corps
commander can only see one enemy division and does not change
Move 2 – 0900 to 1000
Left – French
10th division (top) send
cavalry to pin Austrian right flank
Rest of division deploy to attack
9th division (bottom)
cavalry advance to pin Austrian left flank
Remainder of division advance through
hills
Corps commander changes their orders
to Engage
Right – Austrian
Infantry on right flank form square
Artillery fire on infantry but no
casualties
Corps commander sights enemy cavalry
bottom left
He orders 1st division to
retreat towards river Danube.
Move 3 – 1000 to 1100
Left – French
10th division (top) advance
and deploy
Receive first artillery casualties
9th division (bottom)
cavalry lose melee and rout back to hill
Artillery unlimber on hill
Infantry advance in column of attack
Right – Austrian
Hussar brigade charge and rout
Bavarian light horse
They are disordered by the melee, and
are now within short range of enemy artillery on hill
Infantry form square on flanks, centre
starts to retreat
Artillery limber and retire towards
bridge
Move 4 – 1100 to 1200
Left – French
10th division (top)
infantry advance towards enemy square
Artillery fire on square and cause 10%
casualties
9th division (bottom)
artillery fire on Austrian horse and cause 10% casualties
Infantry advance and fire on enemy
cavalry, but no casualties
Cavalry rally on hill.
Right – Austrian
Hussar brigade retreat towards river
Town garrison and centre infantry
brigade retreat through the town
Infantry on flanks retire in square.
Move 5 – 1200 to 1300
Left - French
10th division (top)
artillery fire on square and cause casualties
Two infantry brigades advance and
cause more casualties with skirmish fire
Artillery limber and advance
9th division (bottom)
cavalry rally and advance towards woods
Infantry advance over hill and form at
base
Artillery limber and prepare to
advance
Right - Austrian
Infantry square (top) receive 30%
casualties, fail morale and rout
Infantry square (bottom) form column
of march and join retreat
Division has now broken contact with
the enemy
Move 6 – 1300 to 1400
Left – French
10th division (top) cavalry
charge and cut down routed infantry
Remainder of division pursue retreating
enemy
9th division (bottom)
cavalry advance south of woods
Infantry and artillery deploy ready to
advance
Right – Austrian
Routed infantry brigade cut down by
enemy cavalry
Remainder of division continue to
retreat towards the bridge
Landwehr
brigade form square north of bridge to protect the retreat
Move 7 – 1400 to 1500
Left – French
10th division (top) move
north of town to support cavalry
9th division (bottom) move
between town and woods
Cavalry charge Austrian hussars, lose melee
and retire Shaken
Right - Austrian
Continue to retreat towards river
Move 8 – 1500 to 1600
Left – French
10th division (top)
continue to advance towards river
9th division (bottom) CinC
takes command of Shaken cavalry brigade
Right - Austrian
Division has reached bridge
The enemy is too close for them to
cross to the east bank
They will have to deploy and hold the
bridge until night fall.
Move 9 – 1600 to 1700
Left – French
10th division (top)
artillery unlimber, infantry deploy to
attack
9th division (bottom)
cavalry join rest of division
Right - Austrian
Jager brigade retire across the bridge
Cavalry withdraw facing the enemy
Remainder of infantry form square and
move towards bridge
Move 10 – 1700 to 1800
Left – French
10th division (top)
artillery open fire but no casualties
9th division (bottom)
artillery unlimber, infantry and cavalry move towards bridge
Right - Austrian
Cavalry follow jager brigade over
bridge
Artillery and two infantry brigades
form rear guard
They must hold for two hours until
nightfall
Move 11 – 1800 to 1900
Left – French
10th division (top) artillery
fire on square and inflict casualties
Infantry fire on gunners who rout and
flee over the bridge
9th division (bottom)
artillery fire on grenadier brigade and inflict casualties
Right - Austrian
Gunners fail morale due to infantry
fire and rout onto the bridge
Hussar brigade already on bridge are
shaken
Jager brigade moves north from bridge
Both infantry brigades west of the
bridge have taken casualties but hold
Move 12 – 1900 to 2000
Left – French
10th division (top)
artillery fire on landwehr brigade who rout
9th division (bottom)
artillery fire on grenadier brigade who also rout
Cavalry charge routed landwehr brigade
and cut them down
Right - Austrian
As night falls the division is broken
and in rout.
Only the jager brigade remains to form
a rear guard
Summary
1st Austrian division
finished the battle with just one formed infantry brigade to hold the bridge
and cover the retreat. The remainder of
the division was effectively destroyed.
This was a battle which should never have been fought. General Bubna had paid the price of trying
to hold the town against odds of two to one and with a river at his back.
The division has lost two infantry
brigades cut down and forced to surrender.
One infantry brigade is in rout and
another shaken
The cavalry have routed from the field
The gunners are also in rout and have
abandoned their guns
Only one infantry brigade is formed
and holds the bridge to cover the rout
The Austrians have lost 1440 infantry
and 40 cavalry, plus 40 gunners and their guns
The French have not suffered any
casualties
1st Austrian corps have
effectively lost one of their two divisions.
The second division will eventually
have to face the same odds of two to one


No comments:
Post a Comment